How to enable hardware virtualization in bios
You can enable and disable hardware virtualization by change your BIOS setting. Here is a simple explanation on how to enable hardware virtualization for both Intel virtualization Technology (vt,vt-x) and AMD Virtualization (AMD-v).
1. Make sure your system support virtualization technology. You can use Microsoft Hardware-Assisted Virtualization Detection Tool if your processor support virtualization. You can also use securable and this program does not require any installation, just download and run the program.
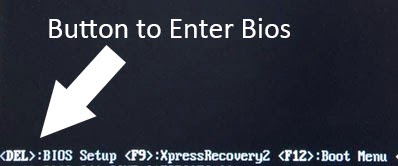
2. Power on your PC and enter BIOS setting. I use Gigabyte motherboard so Upon power on, I just press DEL (delete) button to enter BIOS. Depend on your motherboard, you may need to press different key to enter BIOS such as F2 and F6(notebook).
3. Now locate the BIOS feature or BIOS setting , from here you will see the option to enable and disable your BIOS setting. On my Gigabytes BIOS, the virtualization is located in the advance BIOS features.
4. Now to enable this setting and press F10 to save changes and exit. Your computer will reboot with Vitualization feature enabled.
I use virtualization to run virtual box, so i can install and test any operating system that available. Currently I have windows 8, linux mint, ubuntu and android on my Virtual box. This feature is great for a lazy person like me to set up a partition and run multiboot on my computer. Beside that, to dual boot windows and Mac OS on my AMD machine is quite difficult.
The Virtualization name in BIOS varies depend on your system, here is few example:
-Virtualization - Found on my Gigabyte UDH3 motherboard using AMD processor
-Vanderpool Technology - Found on Asus p5k-se under advance CPU technology
-Intel Virtualization Technology - Intel processor and Gigabyte UEFI DualBIOS
1. Make sure your system support virtualization technology. You can use Microsoft Hardware-Assisted Virtualization Detection Tool if your processor support virtualization. You can also use securable and this program does not require any installation, just download and run the program.
2. Power on your PC and enter BIOS setting. I use Gigabyte motherboard so Upon power on, I just press DEL (delete) button to enter BIOS. Depend on your motherboard, you may need to press different key to enter BIOS such as F2 and F6(notebook).
 |
| Upon booting, your post screen will show what key you need to press to enter BIOS. |
3. Now locate the BIOS feature or BIOS setting , from here you will see the option to enable and disable your BIOS setting. On my Gigabytes BIOS, the virtualization is located in the advance BIOS features.
 |
| You can enable and disable the virtualization feature in BIOS. Make sure to save changes and restart. |
4. Now to enable this setting and press F10 to save changes and exit. Your computer will reboot with Vitualization feature enabled.
I use virtualization to run virtual box, so i can install and test any operating system that available. Currently I have windows 8, linux mint, ubuntu and android on my Virtual box. This feature is great for a lazy person like me to set up a partition and run multiboot on my computer. Beside that, to dual boot windows and Mac OS on my AMD machine is quite difficult.
The Virtualization name in BIOS varies depend on your system, here is few example:
-Virtualization - Found on my Gigabyte UDH3 motherboard using AMD processor
-Vanderpool Technology - Found on Asus p5k-se under advance CPU technology
-Intel Virtualization Technology - Intel processor and Gigabyte UEFI DualBIOS


Comments
Post a Comment