How to Replace Asus Zenfone 5 LCD and Digitizer
After 10 years I dedicated my life fixing computers, today I spent my money and time just to learn how to fix a smart phone. There are few youtube videos that shows how to fix or Replace Asus Zenfone Screen. They make it look easy but after I tried do it myself, there are few important point we need to know. So here is the lesson I learned and hope would be helpful to others:
Note:
If you need the video tutorial, here is the best so far : https://www.youtube.com/watch?v=DgDOgezZVCc
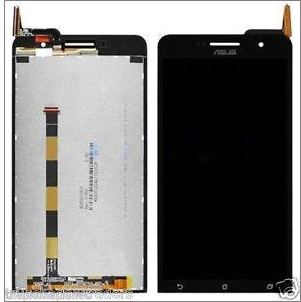
1. The screen is a combination of Digitizer and LED/LCD.
For zenfone 5 model, don't buy LCD and touchscreen separately. Buy both of them which already stick together. This is because to remove only touch screen (digitizer) is too technical and one mistake you'll break the Black LCD Layer. Trust me I broke one and waste 5 dollar to buy only digitizer, then spend another $23 for this.
2. Make sure to have the following tools:
- Phone repair set : Look at the video and you'll find out what you need to have. here is an example:

-Glue : To stick the new LCD to the frame properly so that it will not loose. Loose LCD will cause unsual behavior or certain part of the screen will not respond to your touch.
-hot Air Blower : We nee to apply heat on original screen before we remove it. Otherwise it will break the frame.
3. Assamble Everything Properly.
You need to be patience and install everything properly, it happened to me where I only glue the upper part of the screen and does not apply tape on certain cable. After boot I found out home screen does not work. Re-assamble and add glue on all side, then everything work fine.
If you have any question you may ask me here, I'm sorry for my English or Terms I used here since I'm not familiar with smart phone terms.
Note:
If you need the video tutorial, here is the best so far : https://www.youtube.com/watch?v=DgDOgezZVCc
1. The screen is a combination of Digitizer and LED/LCD.
For zenfone 5 model, don't buy LCD and touchscreen separately. Buy both of them which already stick together. This is because to remove only touch screen (digitizer) is too technical and one mistake you'll break the Black LCD Layer. Trust me I broke one and waste 5 dollar to buy only digitizer, then spend another $23 for this.
2. Make sure to have the following tools:
- Phone repair set : Look at the video and you'll find out what you need to have. here is an example:

-Glue : To stick the new LCD to the frame properly so that it will not loose. Loose LCD will cause unsual behavior or certain part of the screen will not respond to your touch.
-hot Air Blower : We nee to apply heat on original screen before we remove it. Otherwise it will break the frame.
3. Assamble Everything Properly.
You need to be patience and install everything properly, it happened to me where I only glue the upper part of the screen and does not apply tape on certain cable. After boot I found out home screen does not work. Re-assamble and add glue on all side, then everything work fine.
If you have any question you may ask me here, I'm sorry for my English or Terms I used here since I'm not familiar with smart phone terms.


Comments
Post a Comment